Introduction
This guide aims to explain and demonstrate how to configure, view and change data tags remotely on the NJ/NX MAC via an OPC-UA client and 4G modem.
Pre-Requisites
OMRON Sysmac Studio knowledge
Further Reading
Where can I learn more about Sysmac Studio?
NJ/NX CPU Unit OPC UA User's Manual
Intercel eSAM - Port Forwarding Manual
Procedure
This guide uses the following devices:
- OMRON NX102 PLC
- 4G SIM modem - Intercel eSAM
- A PC with Sysmac Studio and OPC-UA client software installed
- Network switch with a minimum of 3 ports
Step1 - Setting up the network
The local network will need to be initialised for all the devices to communicate with each other. In this example they all reside on the 192.168.250.XXX network. Please ensure that each device has its own unique number as seen in the image below.
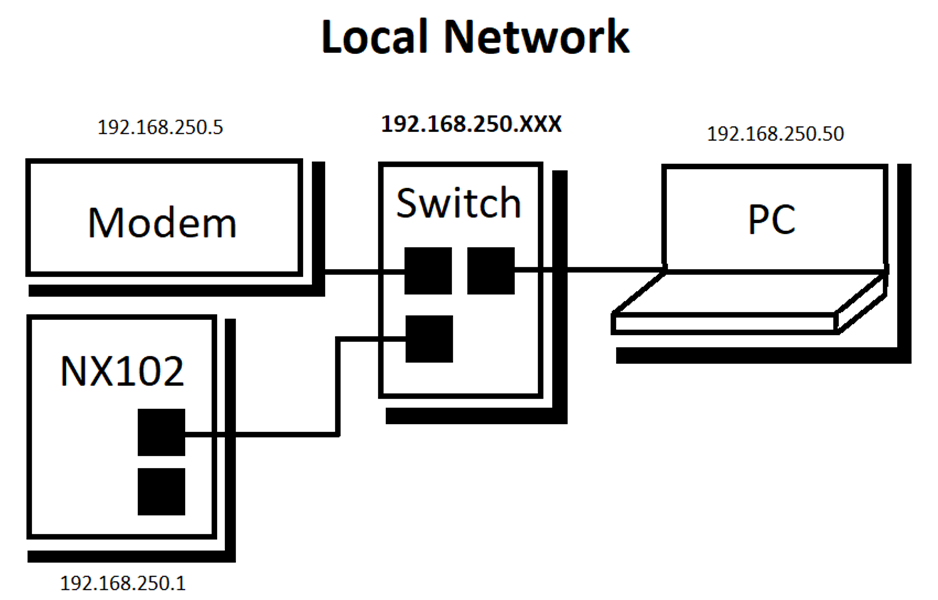
NX102 IP address
Open Sysmac and create a new project and select the appropriate OMRON Machine Autmation Controller. In this case, the example used is the OMRON NX102-1000.
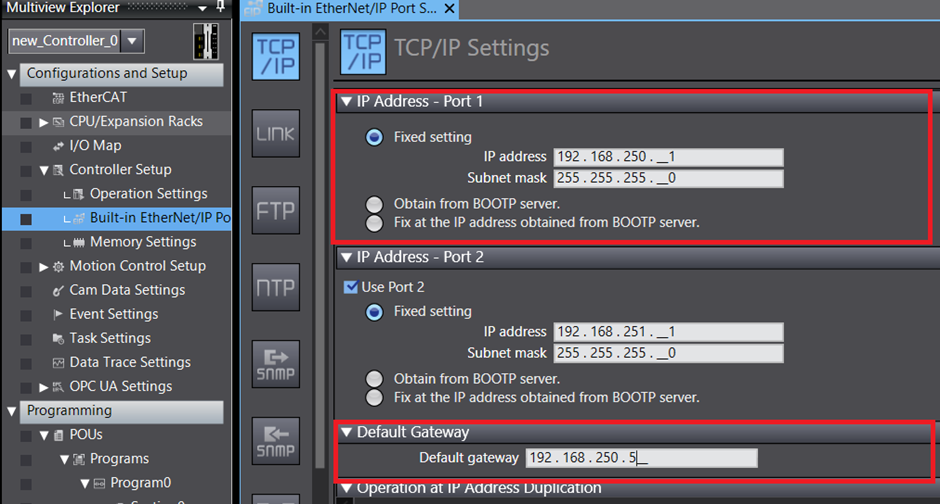
In the multiview explorer, under Configurations and Setup -> Controller Setup -> Built-in EtherNet/IP Port Settings
Keep default IP address for the OMRON NX102-1000 PLC as :192.168.250.1.
Set the default gateway to 192.168.250.5
Note: the default gateway is the local IP address of the modem.
(For Remote OPC UA Access) Modem IP Address
Set the local IP address of the modem. Ensure that the modem IP address is on the 192.168.250.XXX network and that it is the same as the default gateway IP address set in the NX102 TCP/IP settings.
For the Intercel eSAM 4G modem the IP address is set under Network->LAN
 Setting local IP address to 192.168.250.5 with Class C subnet mask (255.255.255.0)PP
For remote access to the OPC UA Server on the NJ/NX MAC, port forwarding rules for port 4840 on the NJ/NX's IP address (192.168.250.1) will need to be added as seen below.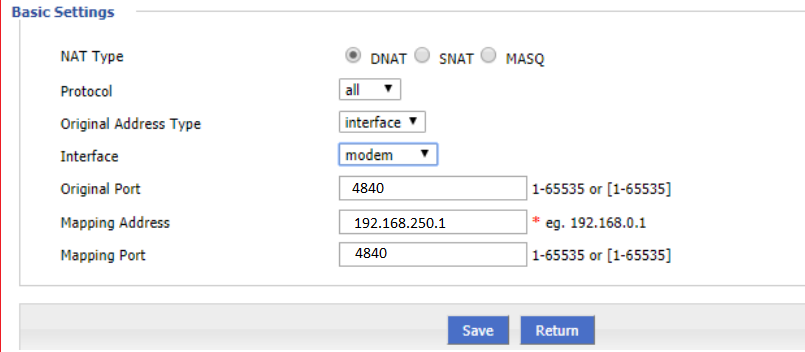
PC/OPC-UA Client IP Address
Local Network Connection
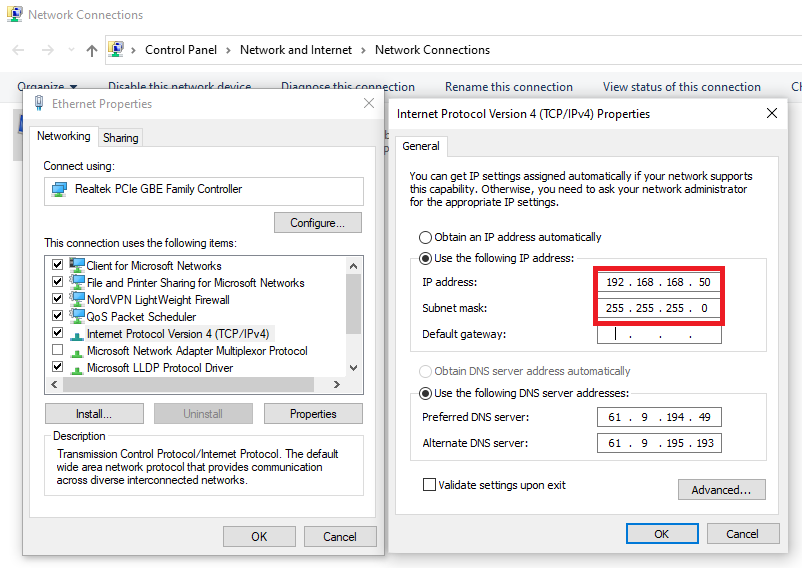
For a local network connection, the OPC-UA client's PC will also need to be on the 192.168.250.XXX network. This means the PC will need to have a static IP address.
On the Windows PC's Control Panel->Network and Internet -> Network Connections:
Right-click the Ethernet adaptor used and select Properties.
Open the Internet Protocol Version 4 (TCP/IPv4).
Select Use the following IP address
Set IP address: 192.168.250.50 and Subnet mask: 255.255.255.0.
Press OK to set the changes.
 Remote Network Connection (via Modem)
The PC/OPC-UA client will only need internet access.
Step 2 - Create Published OPC UA Variables
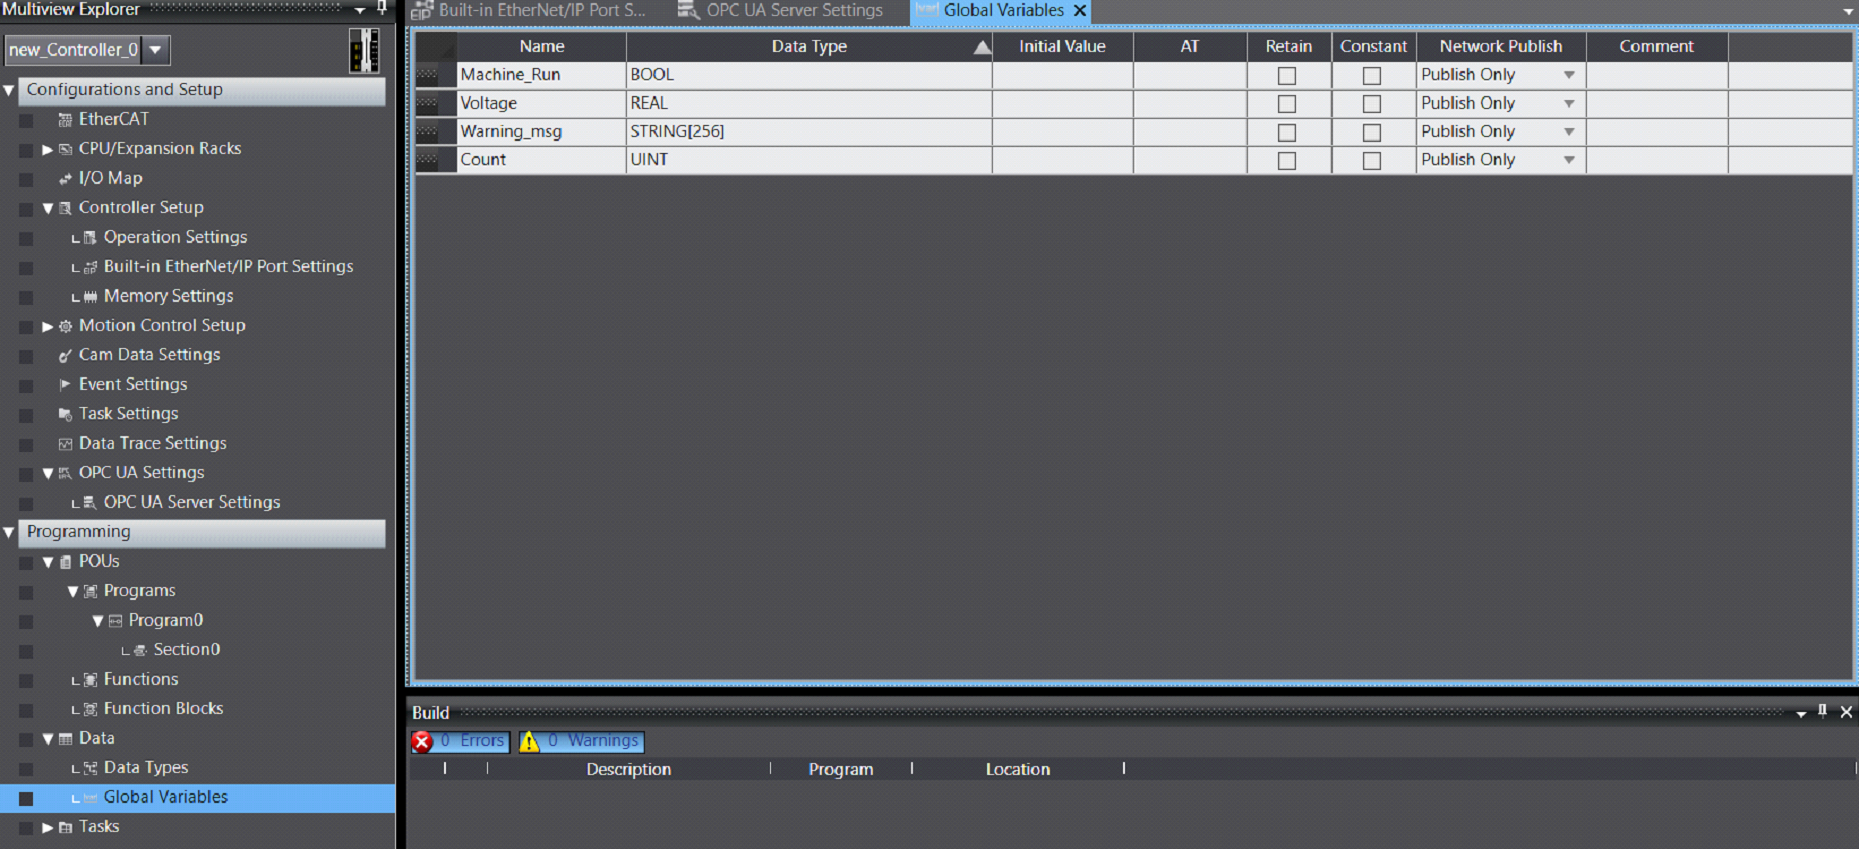
In Sysmac Studio under Programming->Data->Global Variables create four different global variables and set them to Publish Only under the Network Publish column.
| Name | Data type |
| Machine_Run | BOOL |
| Voltage | REAL |
| Warning_msg | STRING[256] |
| Count | UINT |
Step 3 - Enable OPC-UA Server on NJ/NX
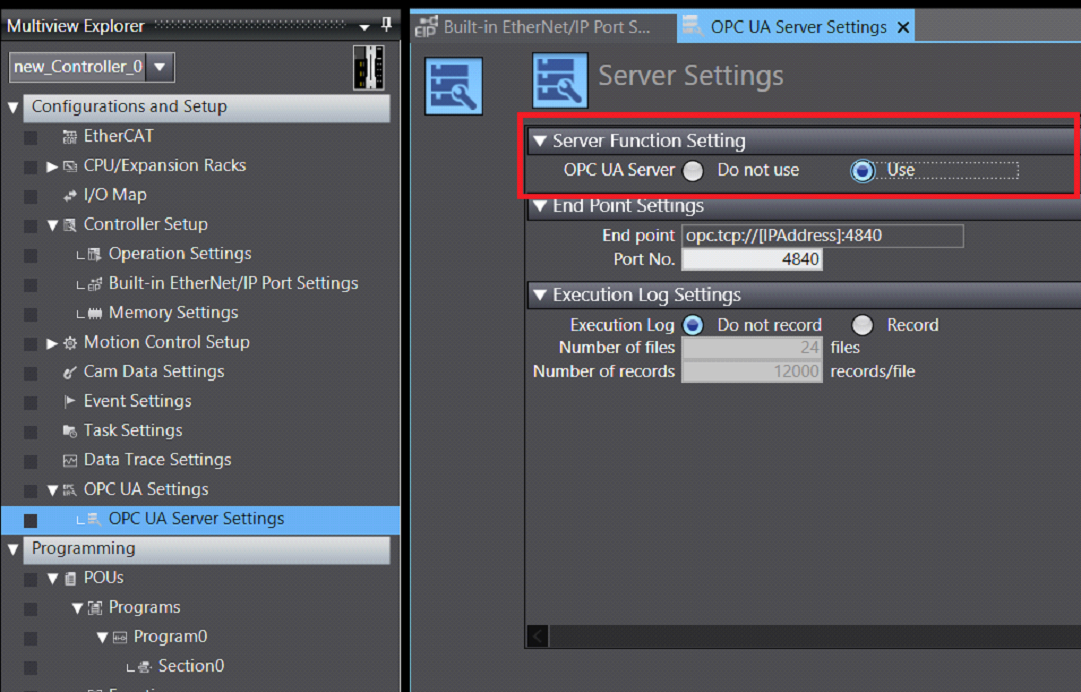
In Sysmac, in the Multiview Explorer window under Configurations and Setup->OPC UA Settings->OPC UA Server Settings:
Server Function Setting: Set to Use to enable the OPC UA Server.
End point Settings: Leave it as the default 4840 (commonly used for OPC UA).
Note the End point addres is opc.tcp://[IPaddress]:4840.
Submit these changes by working online Controller->Online and transferring Controller->Transfer.
Step 4 - Creating an OPC UA Server Certificate
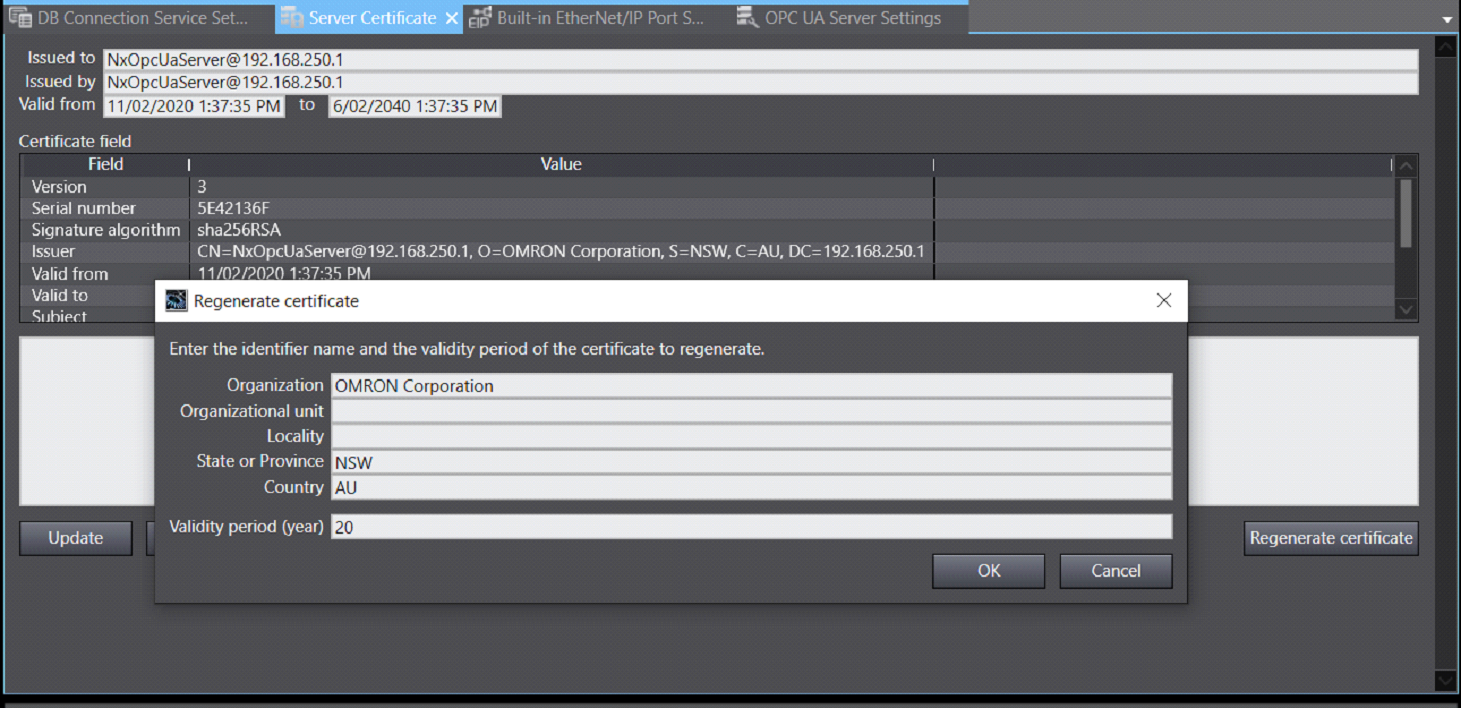
Ensure that there is an online connection with the NJ/NX MAC. In Sysmac Studio, in the Multiview Explorer window under Configurations and Setup->OPC UA Settings->OPC UA Server Settings. Right-click OPC UA Server Settings and select Server Certificate.
A Regnerate Certificate window will pop up, enter necessary details and more importantly the validity period of the certificate in years. Press OK and OK again on the confirmation window to create the certificate.
Step 5 - Test Connection to the NJ/NX OPC UA Server with an OPC UA Client Locally and Remotely
This guide uses a free OPC UA client, in this case Kepware's free version.
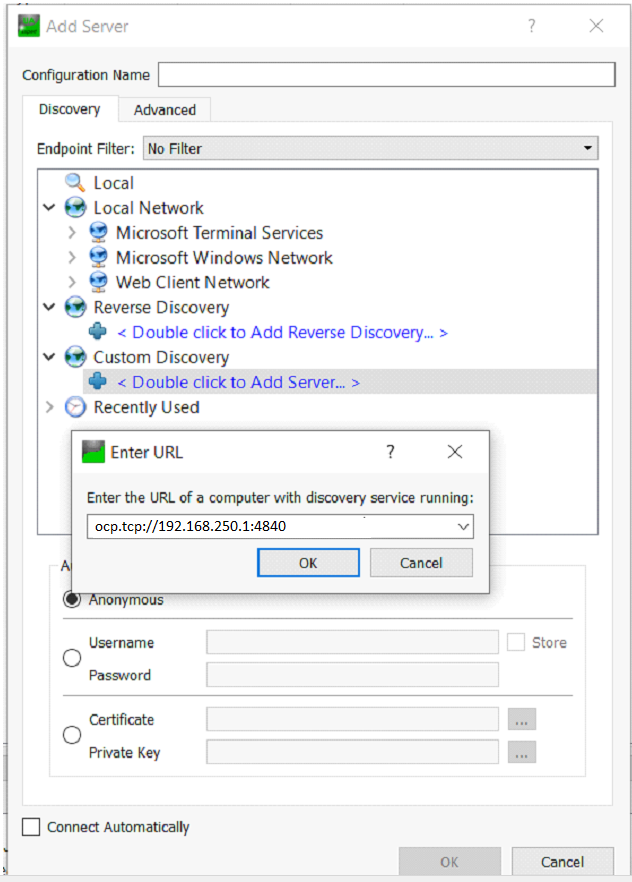
Connect to the server by using the Endpoint:opc.tcp://[IPaddress]:4840
Local Network Connections
Remote Network (Modem) Connections
Note the "omron.dynamicdns.com" is a URL that points to public IP address of the modem.
The public IP address of the modem can also be used instead of the URL.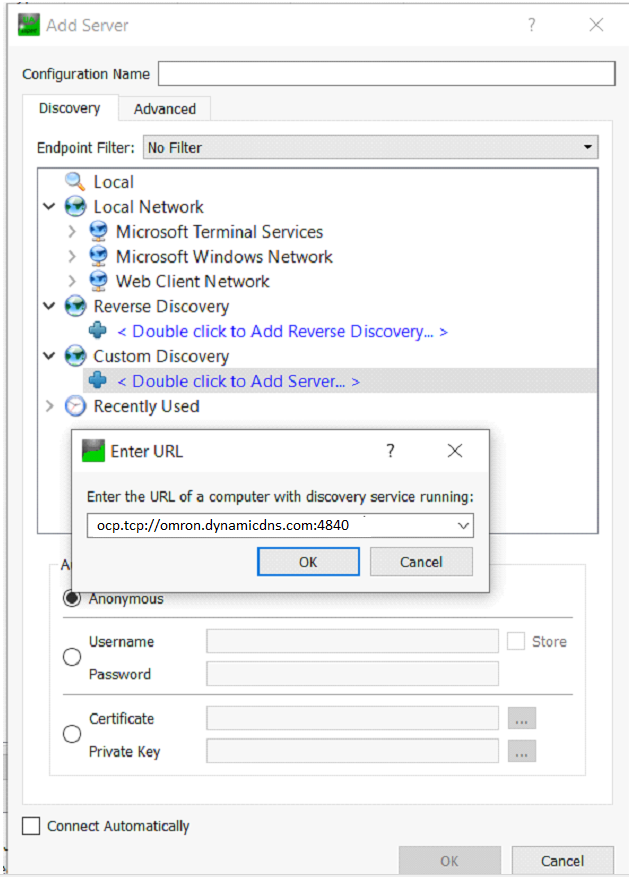
Once connected, the discovered NX OPC UA Server will show. As this guide is not using security for the purpose of demonstration., double-click the None.
In the project window, right-click the added server and hit connect
In the Address Space expand the NX102->GlobalVars. You will see the four variables created in Sysmac. Drag and drop them into the Data Access View.pane.
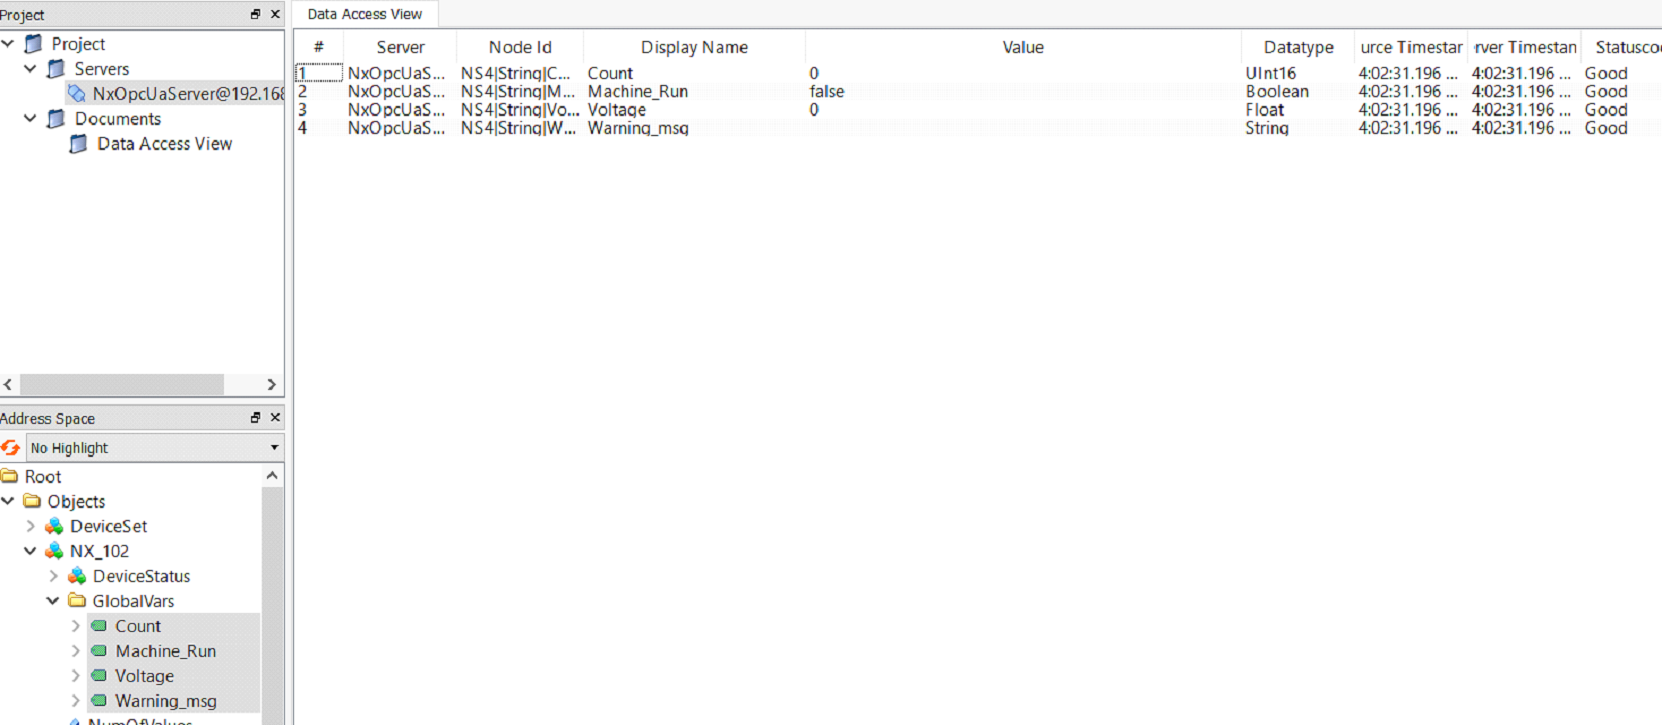
The OPC UA client is now showing a live view of the variables in the OMRON NX102 MAC.
Step 6 - Manipulate and Monitor Variables from Both NJ/NX and OPC UA Client
On the OPC UA client change the values of the GlobalVars added in the Data Access View pane.
| GlobalVars | Value |
| Count | 55 |
| Machine_Run | true |
| Voltage | 245.333 |
| Warning_msg | OPCUA write to NX102 |

Using Sysmac's watch window (short cult alt + 3) the changes can be seen:

Summary
The NJ/NX's OPC UA functionality allows for both local and remote access to the CPU unit to read and write variables with OPC UA clients such as SCADA and MES.
Security of data is of utmost important. Though this guide demonstrates the OPC UA functionality locally and remotely, security must be considered. The NJ/NX OPC UA units do offer authentication with certificates, signatures and encryptions.
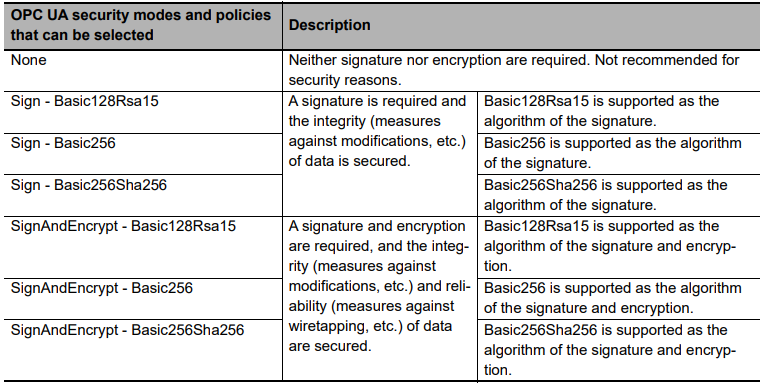
Section 5-2-2 OPC UA Security Mode and Policy NJ/NX CPU Unit OPC UA User's Manual