Introduction
This guide will demonstrate how to convert current NS projects into NS Runtime for IPCs
Further Reading
myOmron Europe - How To Convert CX-Designer Projects Version 8.2 To 8.1
NS Series - CX-Designer v3.XX User's Manual
Procedure
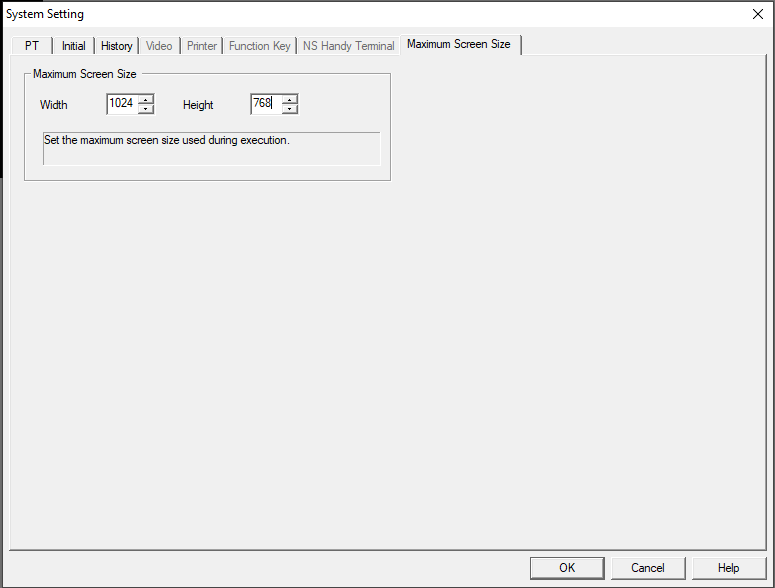
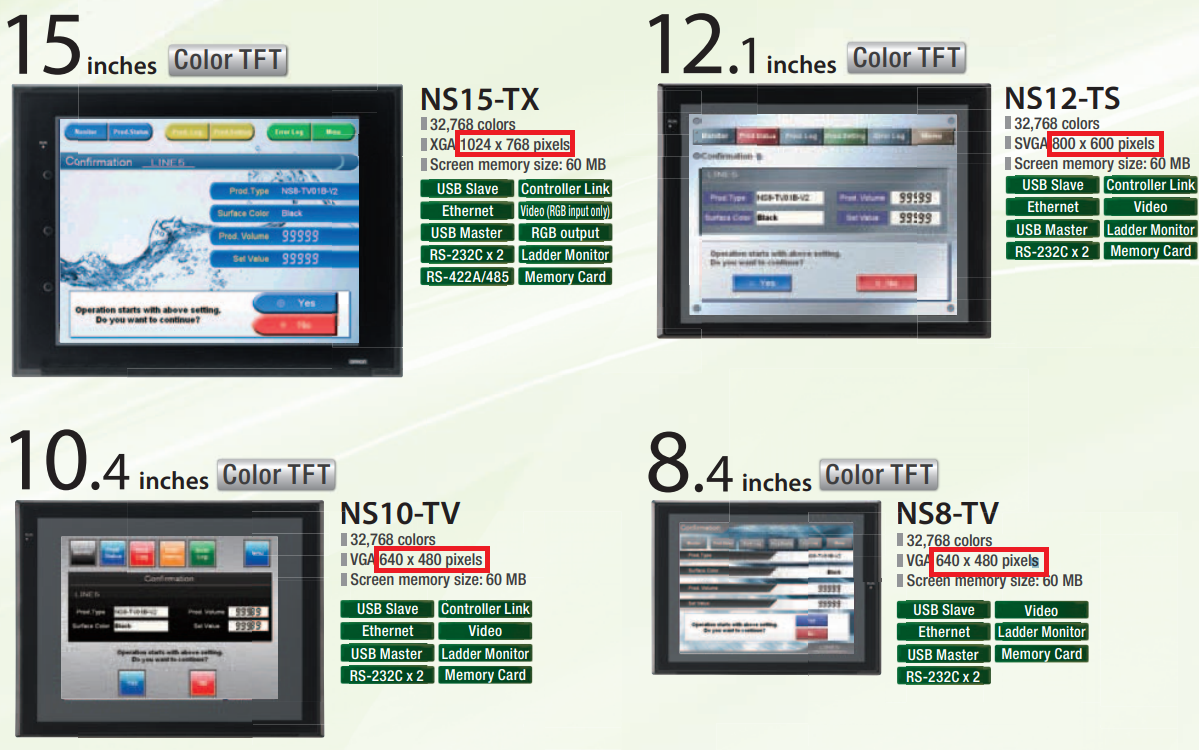
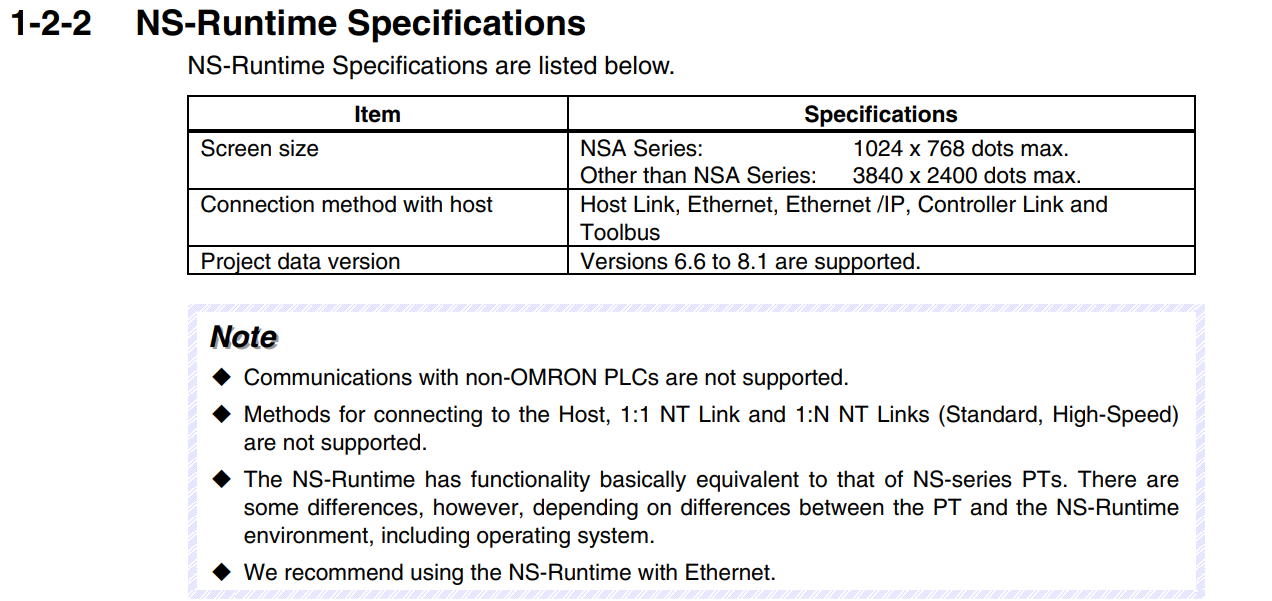 Page 18 - Section 1-2-2 NS Runtime Specifications from the NS Runtime User's Manual
Step 1 - Enable Downward Conversions in CX-Designer
Firstly, ensure that CX-Designer is not running. If it is, please close CX-Designer.
Locate the CX-Designer folder - from default installation: C:\Program Files (x86)\OMRON\CX-One\CX-Designer. Within the CX-Designer folder locate and run the application mod.exe.
Once opened a prompt window will appear asking to enable the function? Select Yes.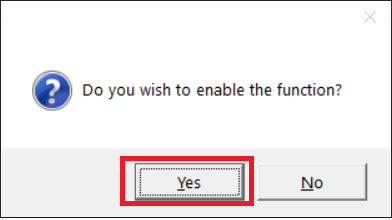
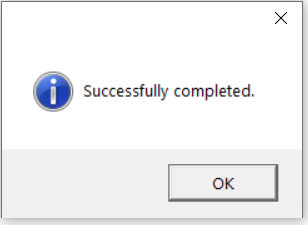
Another prompt window will appear confirming the successful enable of the downgrade conversion function. Click OK to accept and continue.
Step 2 - System Version Downgrade to v8.1
After enabling the downgrade conversion function in Step 1, open CX-Designer and load the NS project to be converted. For this guide, the project to be converted is an NS15-TX0[]-V2 System Ver8.3 as seen in the bottom right side of the project window.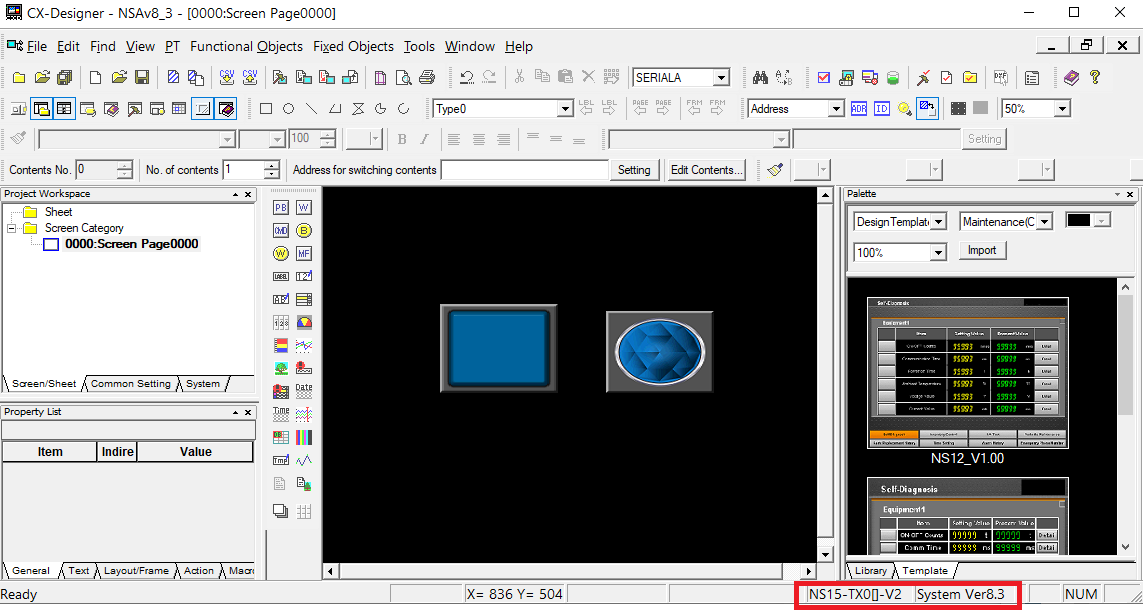
Step 2-1 - Convert from 8.3 to 8.2
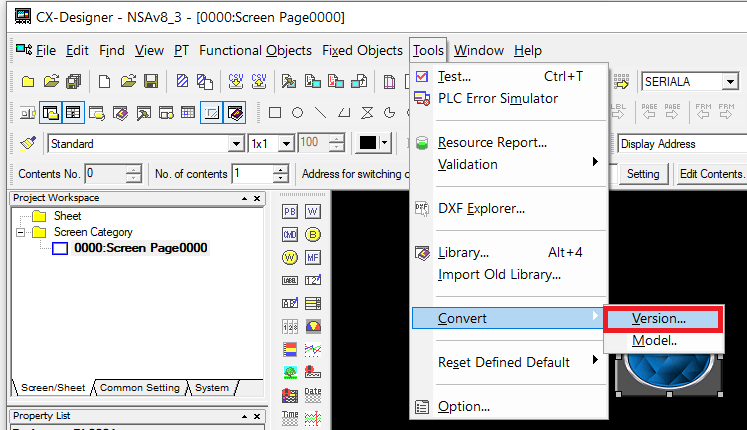
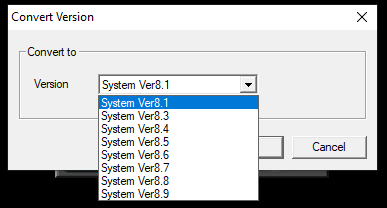
In the main menu, begin the first conversion iteration to 8.1. Tools->Convert->Version
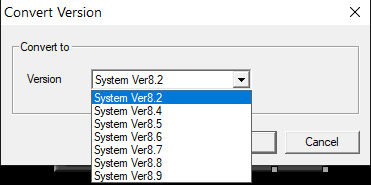
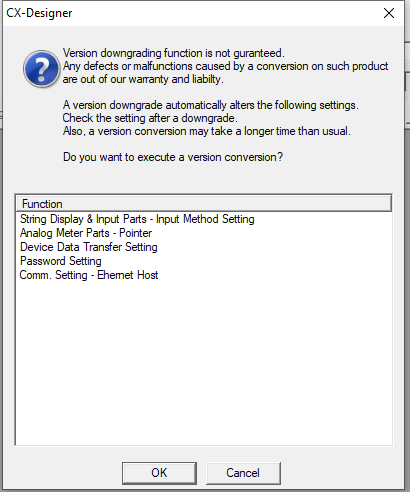
A Convert Version prompt window will pop up, select 8.2 and click OK. Notice how it is only possible to step down 1 version (from 8.3 to 8.2).
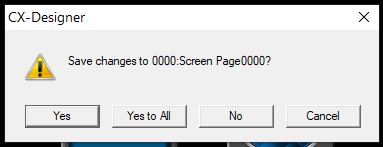
CX-Designer will prompt with a Save Changes window. Click Yes to All.
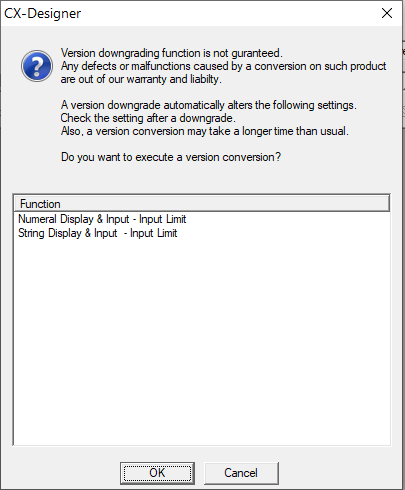
The next prompt will indicate the functionalities lost from the downgrade. Be sure to check the program functionality after the conversion. Click OK to continue.
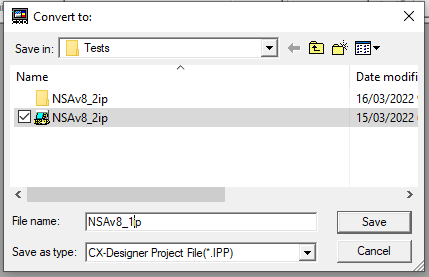
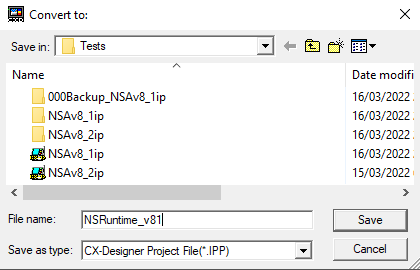
The next prompt requires saving the project with a different name to the current one. In this example, since the version will now be 8.2 - the project is named NSAv8_2. Click Save, the project will start converting.

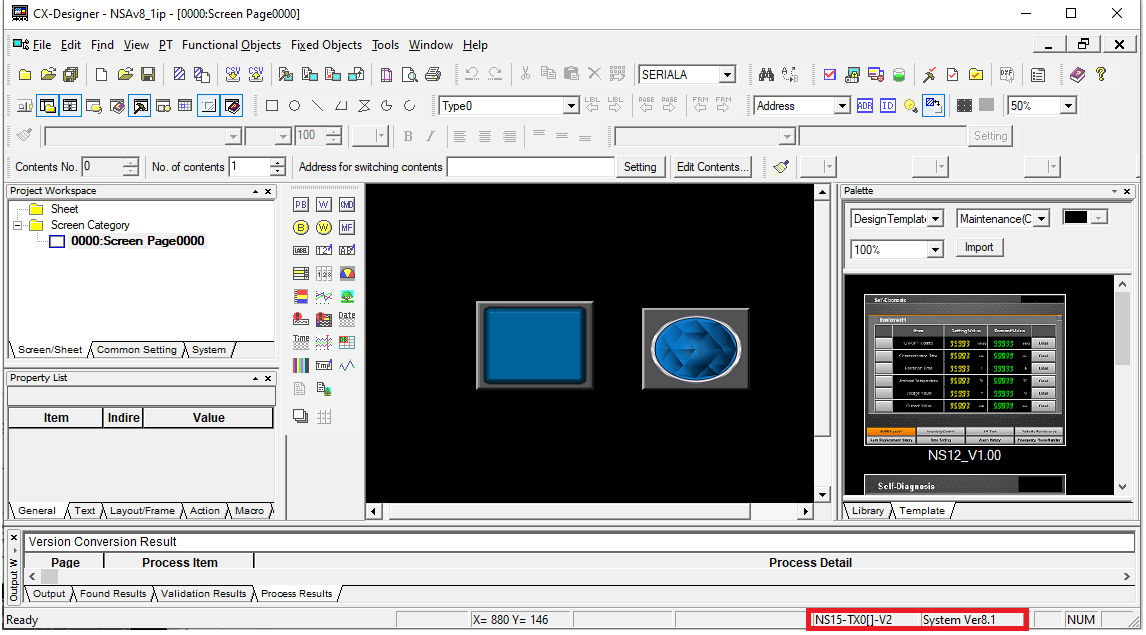
Please wait for the conversion process to complete. Once complete the System Version status in the bottom right corner of the project window will show System Ver8.2.
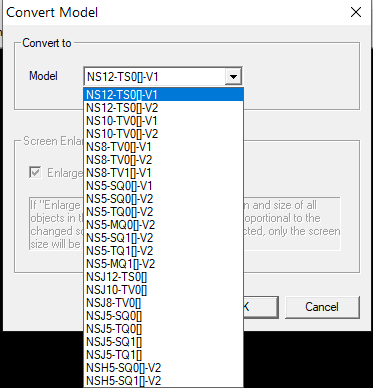
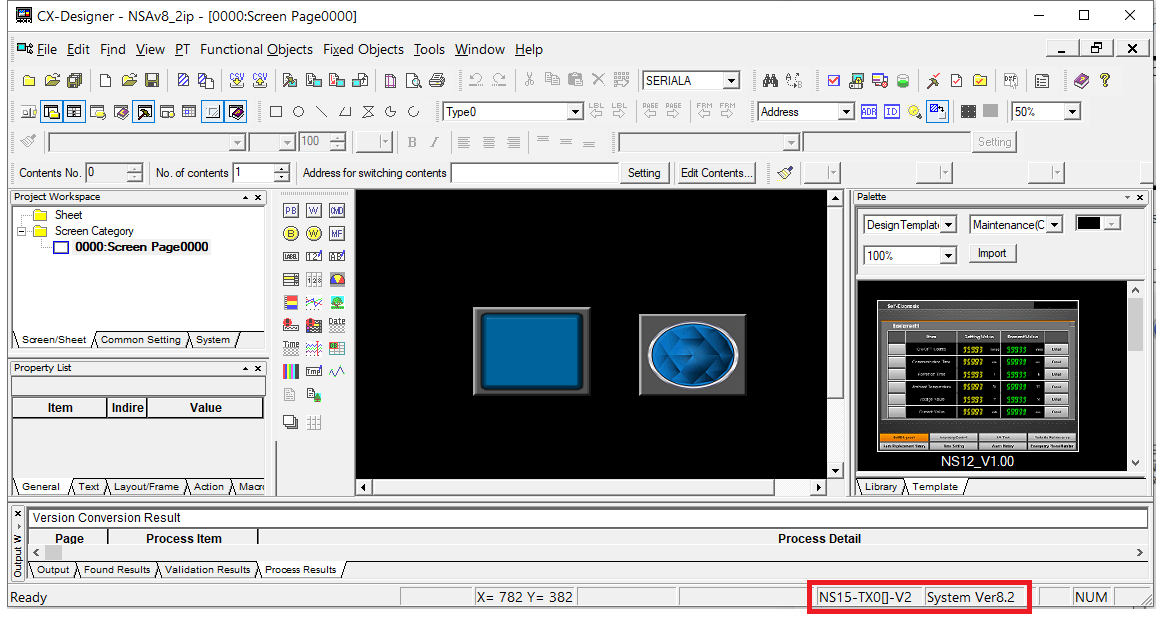 At this stage a model conversion to NS-Runtime is not possible. In the conversion model window, NS-Runtime is not present since the system version is not v8.1. To check this click Tools->Convert->Model.
Step 2-2 - Convert from 8.2 to 8.1
For the second conversion iteration, execute the same steps in Step 2-1.
Select version 8.1 from the dropdown list and click OK.
Prompts will follow similarly, note the changes and loss of certain functions. Click OK to confirm.
CX-Designer will commence the conversion. A convert to prompt will ask to save the project under a new name. In this example, the project was renamed to NSAv8_1ip.
Once saved, notice the system version has changed to System Ver8.1.
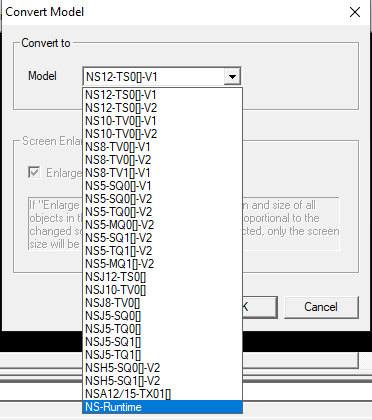
Now that the system version is 8.1, it is possible to convert the model to NS-Runtime.
DeleteStep 3 - Converting Model to NS-Runtime
After converting the NS project to system version 8.1 in Step 2, under Tools->Convert->Model select NS-Runtime (now available) and click OK.
A prompt will pop up confirming all the NS-Runtime restrictions after the conversion process. Click OK to confirm.
CX-Designer will then prompt to save the project under a new name - for this example NSRuntime_v81. Click Save.
Once complete, the properties of the project will show NS-Runtime System Ver8.1
Conversion to NS-Runtime is now complete.
Delete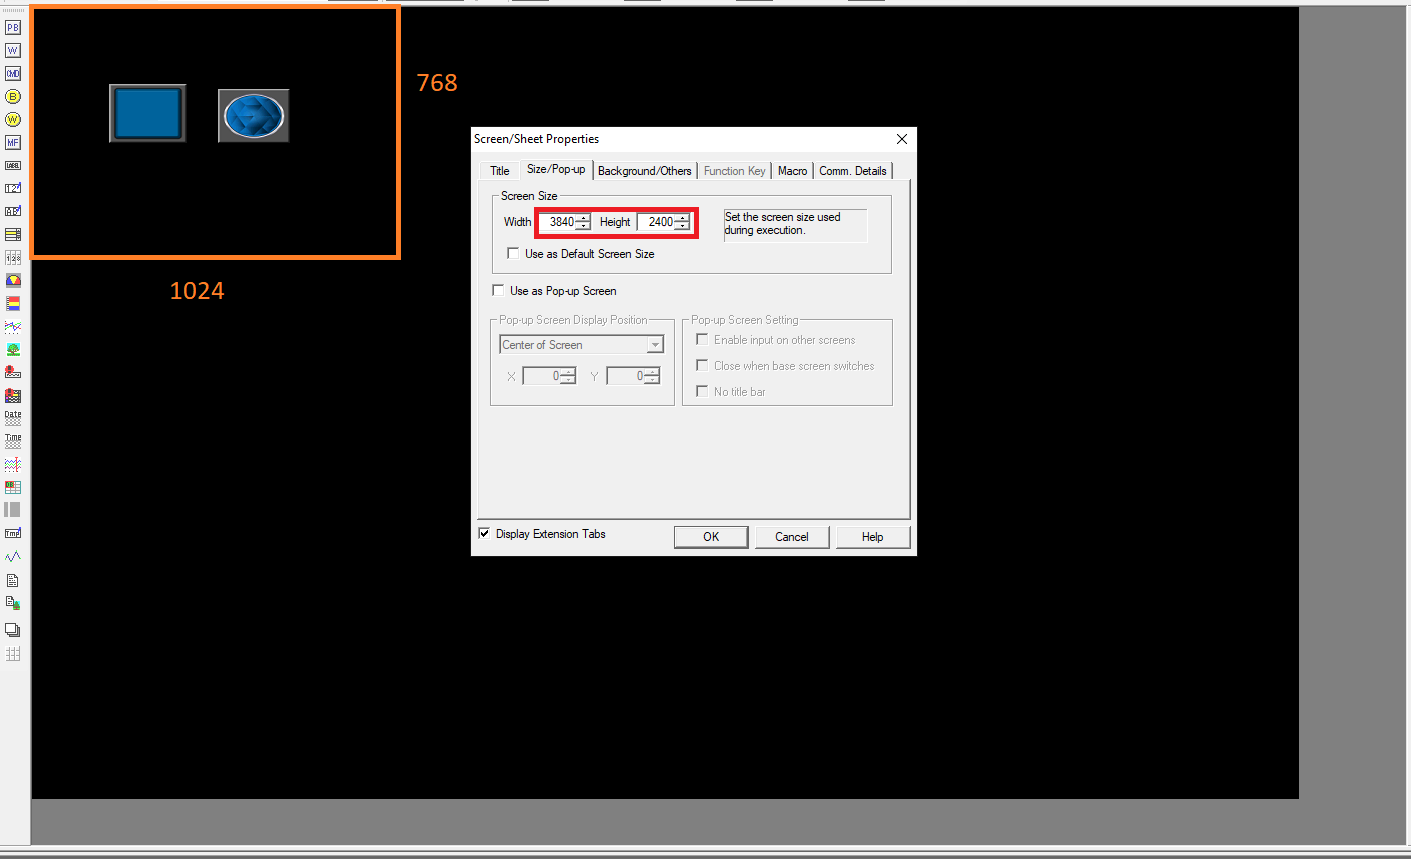
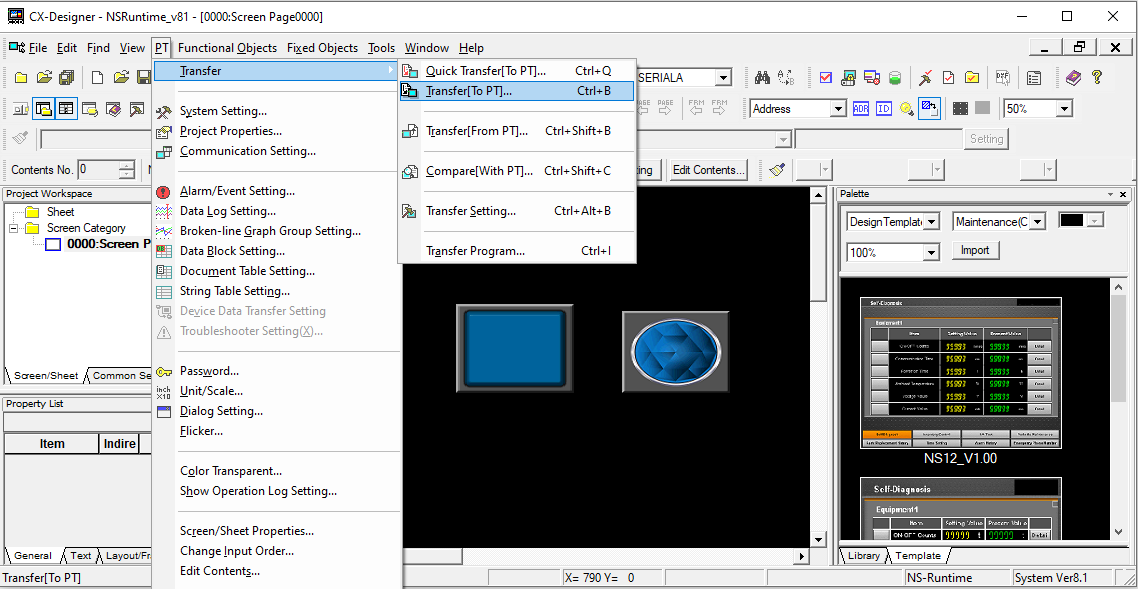
Step 4 - Load the NS-Runtime project to USB
Select transfer to PT (under) PT->Transfer->Transfer[To PT}.
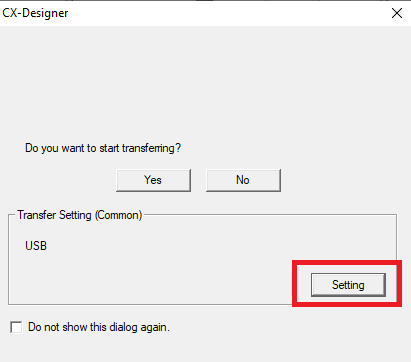
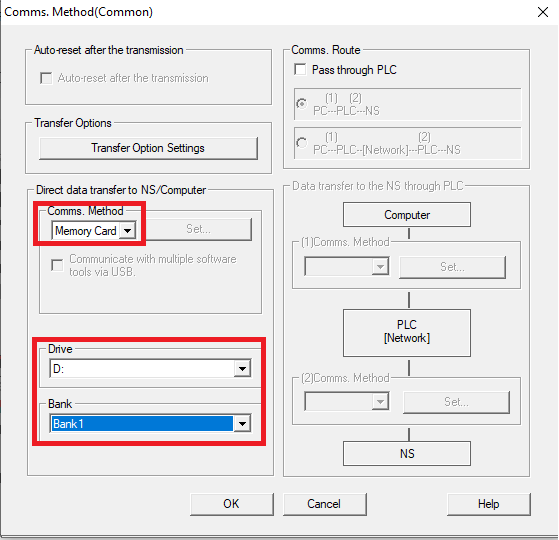
The following window will show, click on Setting.
Plug in a USB and note the allocated drive letter - in this example drive D

Click YES to commence the transfer, once completed click OK


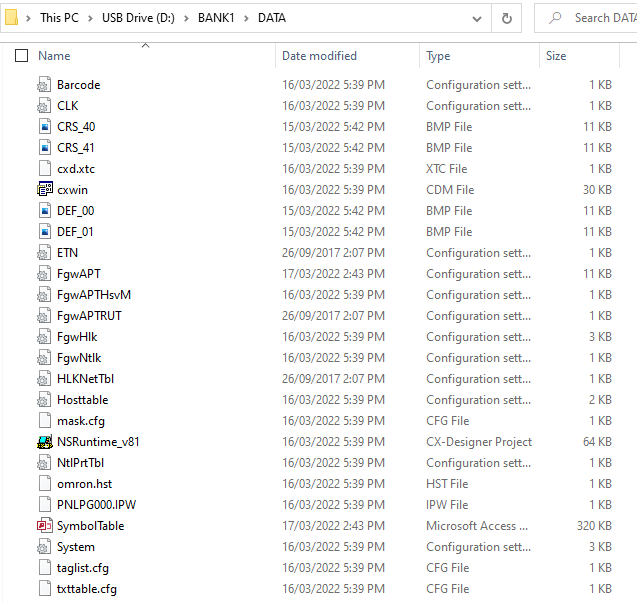
Check the contents of the USB drive on Windows Explorer. The USB drive will have a folder with the name of the Bank chose. In this example BANK1 was chosen with the NS-Runtime DATA files
Step 5 - Loading NS-Runtime project
Insert the loaded USB into the IPC or host computer with the NS-Runtime software. Similarly in Step 4 - note the allocated drive letter. In this example it is drive D.
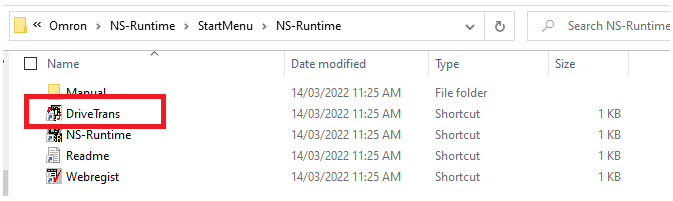
Locate the DriveTrans program from Start->Omron->NS-Runtime or search for DriveTrans. Double click to run the program.
In the Screen Data Transfer set the following parameters.
| Screen Data Transfer Setting | Parameter Setting |
|---|---|
| Direction | Download |
| Specify Drive | Drive allocated to the USB (this example D) |
| Specify Bank | Bank chosen during the CX-Designer Transfer (this example BANK1) |
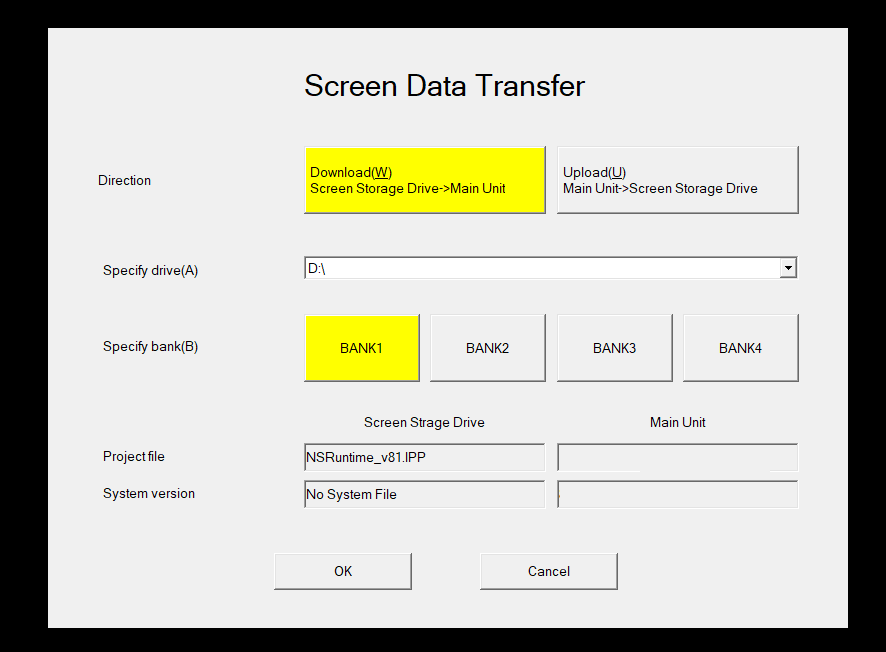
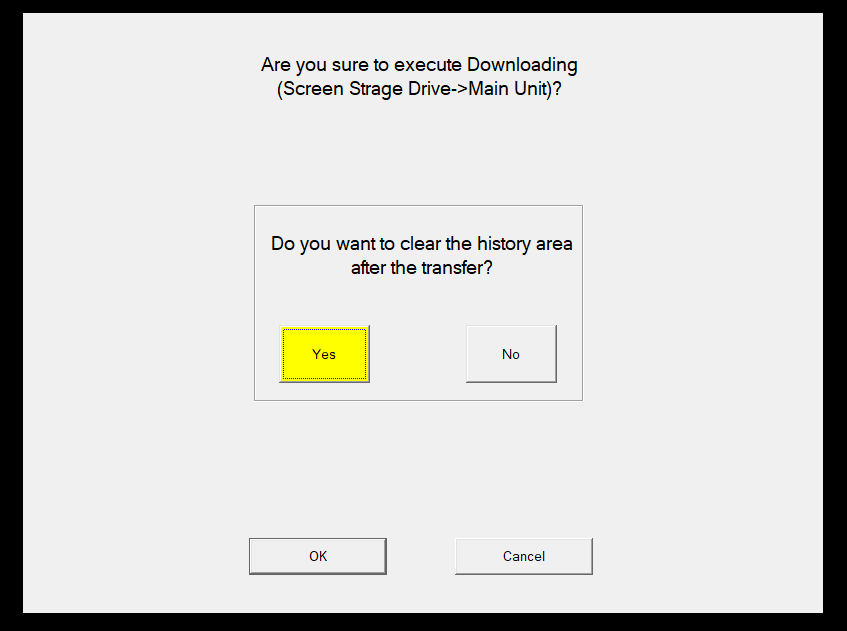
Note when selecting the BANK number the project file will display the project on the drive. Once set click .
Consider the history area of the NS-Runtime. If it is a new project this will not matter. In this example Yes was chosen. Click OK.
Project transfer will commence, once completed make sure the NS-Runtime dongle is inserted into the IPC. Click Restart to restart NS-Runtime with the loaded project.
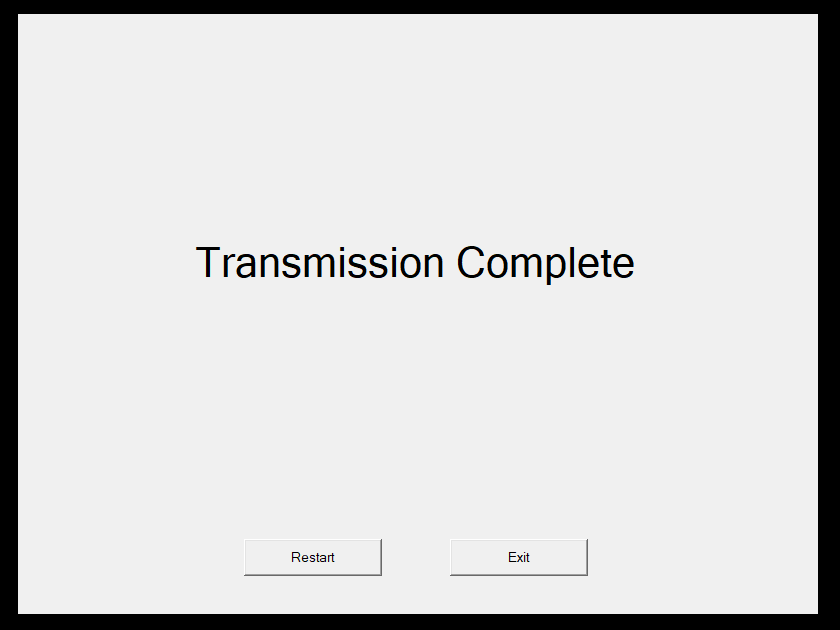
Once restarted the NS-Runtime project will load the initial screen/ The example shown only has one screen.

Step 6 - System Menu
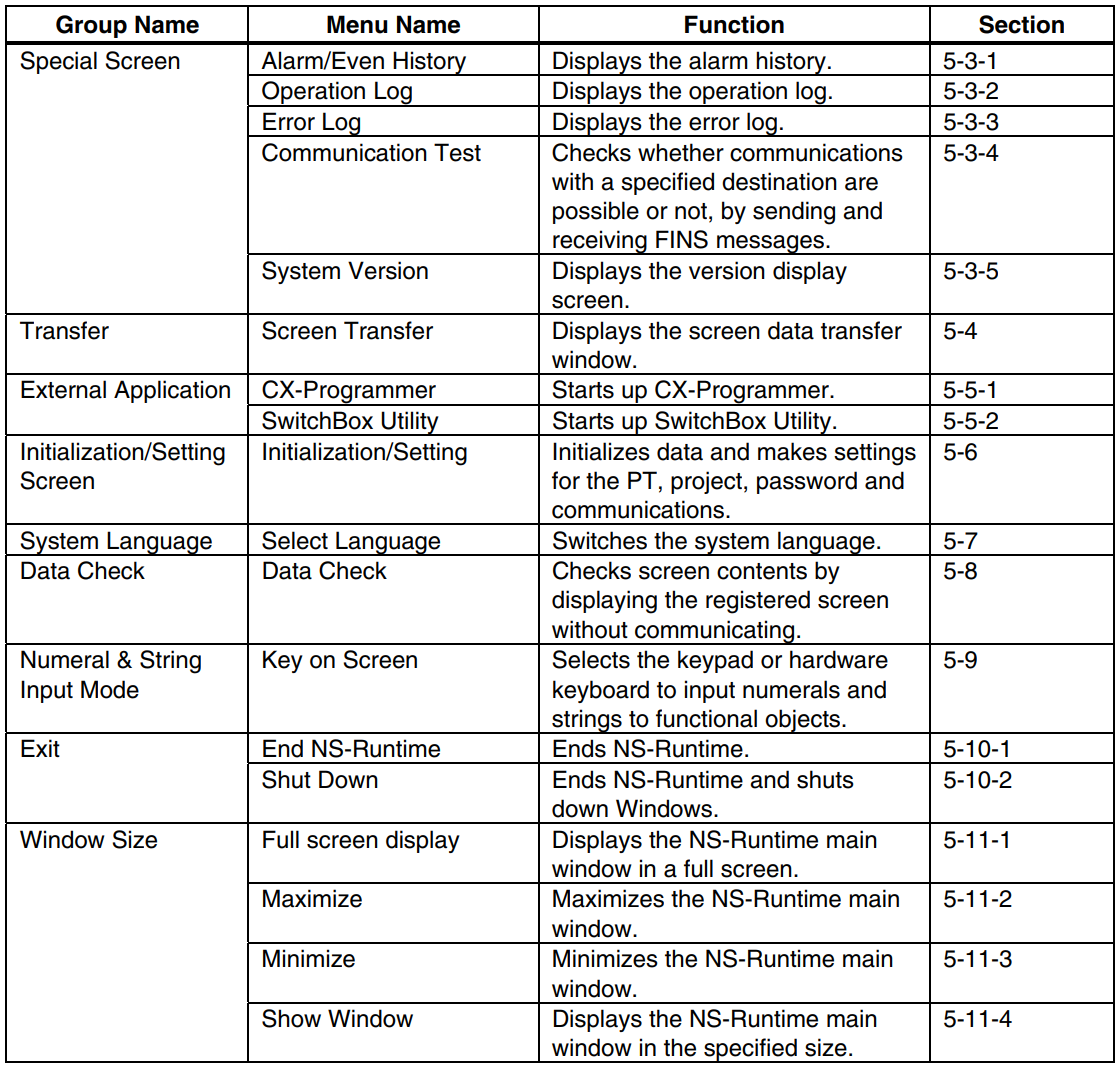
The system menu on NS-Runtime will allow you to:
- Check Alarm/Event histories
- Operation logs
- Project transfer
- Setting Screen
- Language
- Window sizing
- Shutdown/end NS-Runtime
Please see Section 5 of NS Runtime User's Manual
To access the system menu - double click on any of the four corners
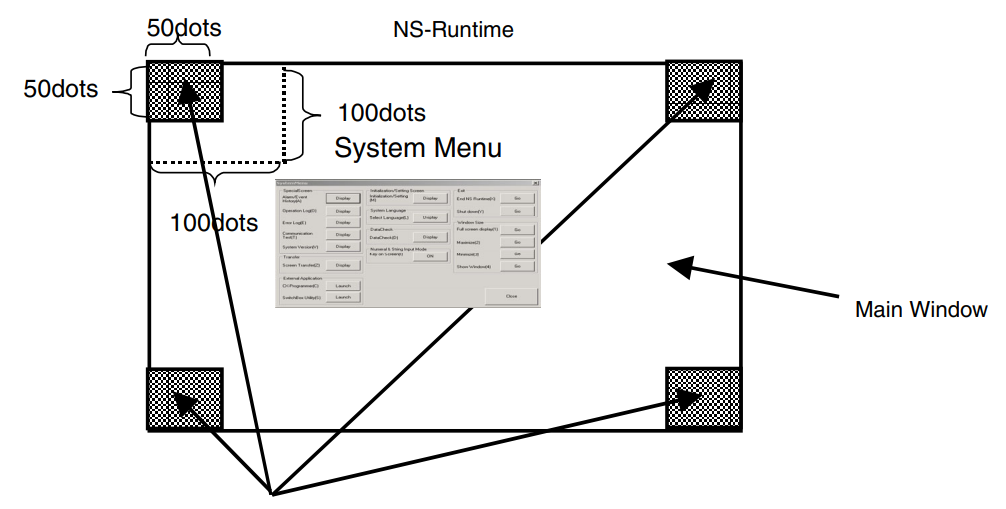
Below is a summary of the system menu options and their functions.