Introduction
This guide explains the steps to set up Sensorless Vector Control. Sensorless Vector control is suitable for applications that require an improved relationship between output torque and rotation speed. It is designed to assist applications that require accurate torque control at specific speeds, such as driving a lift or a conveyor belt with requirements to come to a stop frequently.
DeletePrerequisites
Sensorless Vector Control cannot be used for any other motors other than induction motors. It cannot be selected when the MX2 is set to light load mode or PM motor mode.
The motor has to be connected to the MX2 before Sensorless Vector Control can be set up.
DeleteSetting Up
Before starting the process, it is recommended to back up the parameters currently in the drive using CX-Drive if it is already in production.
Refer to this article for more information on using the CX-Drive.
There are two ways of setting up the Sensorless Vector Control: Offline Auto Tuning and Online Auto Tuning.
Offline Auto Tuning is used when the motor is not allowed to rotate. In this method, the MX2 would require more information. This will be explained in more detail, later in this guide.
Online Auto Tuning is used when the motor is allowed to run freely.
Some parameters will have to be pre-set regardless which method is used.
DeleteStep 1 - Back up and Factory Reset of Drive (Optional Step)
Backing up the drive
1) First, back up the parameters of the drive by using CX-Drive. Connect to the MX2 by using a micro USB cable.
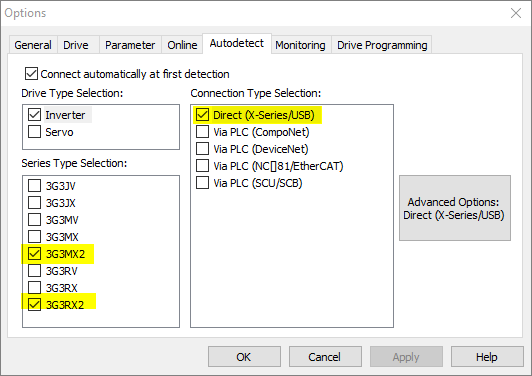
2) Go to Drive -> Autodetect Options to select how the drive is connected. Make sure the Direct option and the intended drive model are ticked:
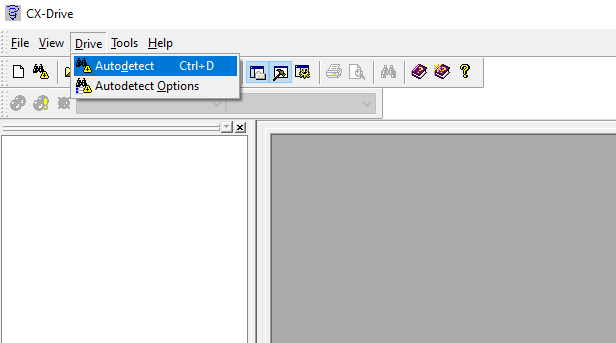
3) Go online by selecting Drive -> Autodetect.
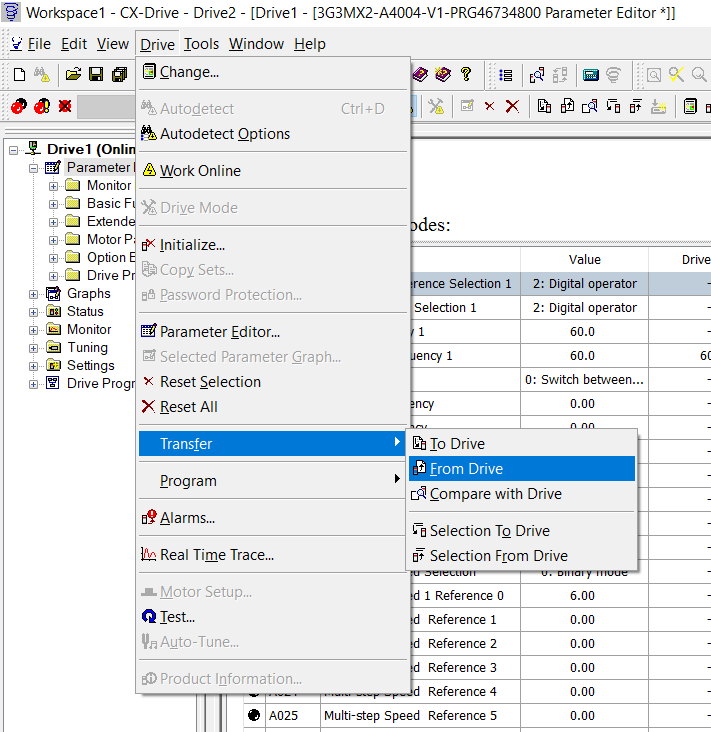
4) Once the drive is online, transfer the parameters from the drive by going into Drive -> Transfer from Drive:
5) Save the file by going into File -> Save as.
Factory Reset
Do a factory reset by changing b084 to 4, followed by b180 to 01 to start the process.
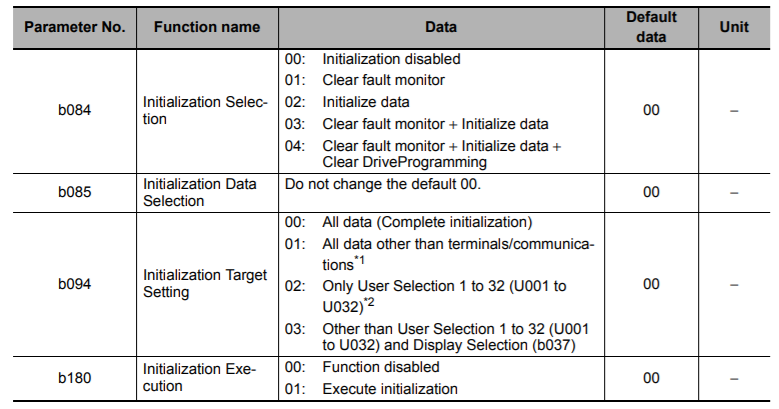
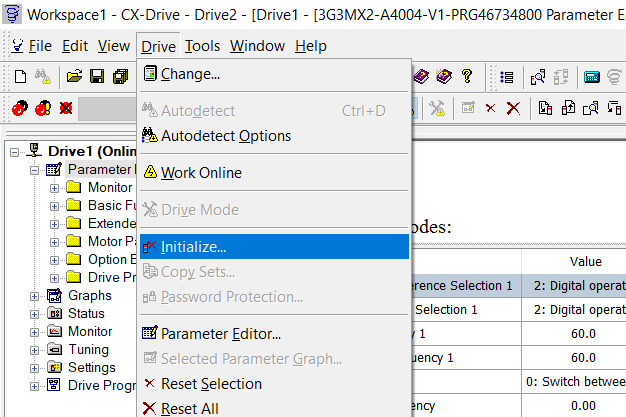
The same process can also be done through CX-Drive. Go to Drive -> Initialize to reset all the parameters on the drive to its default value.
Step 2 - Parameter Setup
First, change A044 to 3.

Next, configure the relevant parameters for Auto-Tuning.
The following table shows the parameter that needs to be pre-set before the Auto-Tuning steps.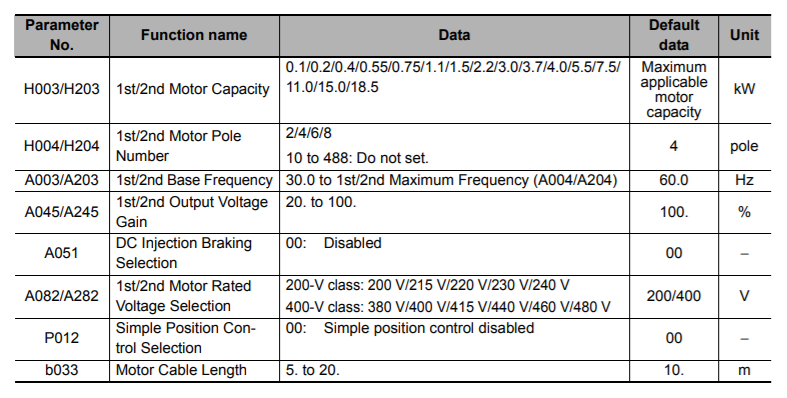
For example, if a 6 pole 0.7kW motor is used. H003 would be set to 0.75 and H004 would be set to 6.
If the 1st/2nd Motor Rated Voltage Selection parameter does not provide data appropriate to the rated voltage of your motor, select a slightly larger value than required and set the following value in the 1st/2nd Output Voltage Gain (A045/A245):
[1st/2nd Output Voltage Gain (A045/A245)] = 100% × [motor rated voltage]/[1st/2nd Motor Rated Voltage Selection (A082/A282)]
We also recommend to enter the motor nameplate current rating to b012, which is set in Amps. This is your electronic thermal protection.
For Offline Auto-tuning, the following parameters have to be calculated manually and inputted. 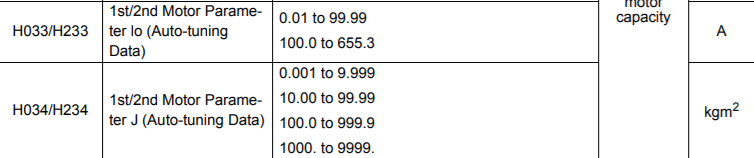
Step 3a - Offline Auto-Tune
Before attempting to start auto-tuning, make sure that the brakes of the motor are disengaged and it is allowed to rotate. The motor must be disengaged from the load but it is acceptable to be connected to a gearbox.
To start offline auto-tune, switch H001 to 01.
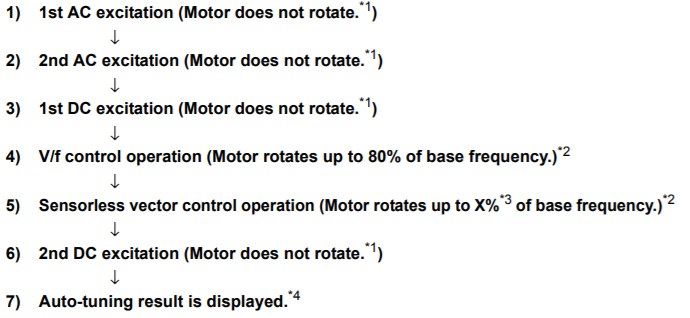
The drive will then initiate the calibration sequence of the motor as seen below:
The results will be displayed from H030 to H032:

As mentioned above, H033 and H034 is calculated manually. The values will only need to be calculated manually when Offline Auto-Tuning is used.
To enable the drive to use these parameters during operation, set H002 to 1.
Transfer the parameters back into the drive if necessary. Be careful not to overwrite the data from H030 to H034 when doing the transfer.
DeleteStep 3b - Online Auto-Tune
Before attempting to start auto-tuning, make sure that the brakes of the motor are disengaged and it is allowed to rotate. The motor must be disengaged from the load but it is acceptable to be connected to a gearbox.
To start online auto-tune, switch H001 to 02.
The drive will then initiate the calibration sequence of the motor as seen below:
The results will be displayed from H030 to H034: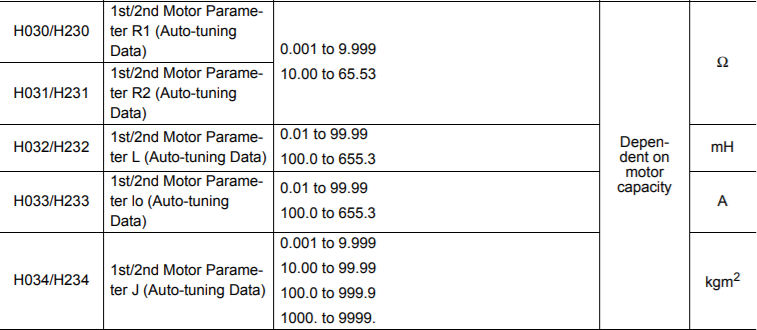
Transfer the parameters back into the drive if necessary. Be careful not to overwrite the data from H030 to H034 when doing the transfer.
Delete
Common Issues
Overvoltage - E07.x
Operations with the drive can sometimes cause overvoltage especially when trying to decelerate. The motor generates a regeneration energy which trips the drive.
Check if the voltage is exceeding the capacity of the motor. If the voltage is too high for a long amount of time, it will lead to high temperature which leads to decrease of lifetime of the motor. If the voltage is within acceptable range, alter the limit at b131.

If the value exceeds the limit, use the regenerative braking function available in the drive or install an external regenerative brake resistor.
Overload
Overload could occur during the auto-tuning process.
Make sure that the brake is disengaged on the motor. If the problem persist, adjust b012 to an appropriate level.
Other Potential Issues
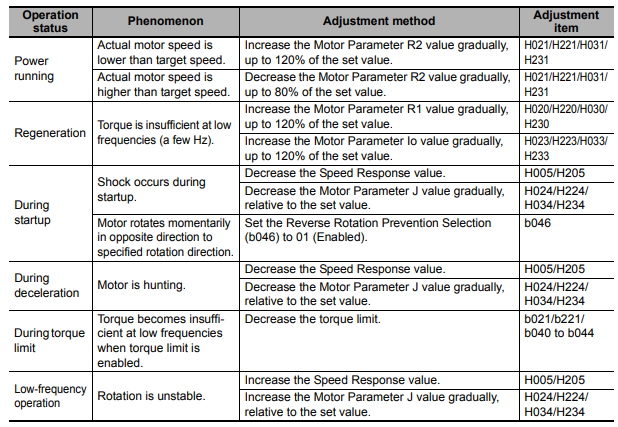
Sometimes, the motor will not perform up to the intended performance characteristics. Adjust the appropriate parameters based on the issue of the motor based on the table below.